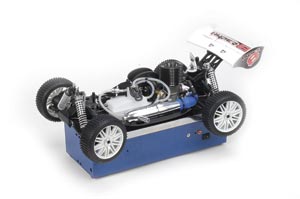
How to setup your starter box? How? Ok, first GET YOUR OWN STARTER BOX!!! If u still using the pullstart thing.. well this post is not for you. hahahha. seriously. whats the point? well, actually u still can use starterbox.. as long as the flywheel access is there.
Ok, to cut thing short, here are a few tips and a must to get your ride start at the 1st push.
1. mark where your engine flywheel is in relation to the flywheel hole in the chassis.
2. Remove your engine, clutch, and exhaust from your vehicle so you have a clear view of the flywheel hole in your chassis. Leave the rest. the arms , shocks and turnbuckles.
3. Place your rolling chassis less the engine onto your starter box and line up the markings from step one around the flywheel hole with the rubber starter donut.
4. All starter boxes come with some sort of adjustable guide pegs that allow you to key your chassis onto the starter box. Now that your flywheel is lined up perfectly with the starter donut, you can mark where these guide pegs will mount onto the top of your starter box. The most common place is between the chassis and suspension arms on all four corners of the car, with two at the front and two at the rear.
5. Once you have the guide pegs in place, double check that the chassis fits slop-free into the guides and that the markings on the flywheel hole match with the rubber donut within the starter box. If there are slight differences in the alignment, now is the time to fix them. Move the guide pegs along the universal mounts, or slot the holes you drilled to provide the perfect alignment. Now install your engine, clutch, and exhaust system onto your chassis again.
6. Alignment is the key to a speedy working starter box, but there is more to starter perfection than just the fit of the chassis. If the switch that starts the electric starter motor is engaged too early or too late, there is still more setup to be done. If your starter motor switch connects too early, the mass of the vehicle simply sitting on the box may trigger the motor and cause the starter box to run continuously. If the switch connects too late, the compression of the engine may be too high for the electric starter motor to overcome from a static position. The ideal time for the switch to make contact and rotate the starter motor is after downward pressure has been placed on the vehicle on the starter box but just before the flywheel actually comes in contact with the rubber donut. The starter box switch is fully adjustable and adjustments are usually made simply with a small screw accessible externally. Read through your starter instructions to learn more about switch adjustments, then give yours a quick look to be sure it is connecting at exactly the correct time.
7. Now it's time to test the setup. With your starter box turned on, drop your vehicle into place and press down on it. If the previous steps were followed properly, the flywheel should be aligned perfectly with the rubber starter donut, the motor should switch on just before the engine flywheel makes contact with the rubber donut, and the engine should turn over immediately without having to move the chassis or tweak the pressure downward in any way.
Before we wrap up there is one final issue that needs attention, and that has to do with the direction of starter donut rotation. When you are looking at your engine from the front, and the first thing you see is the clutch assembly with the carburetor directly behind it, the direction of flywheel rotation is counter clockwise. Make sure to double check that your starter box is rotating your engine in the correct direction before you try to start it; nitro mills can start backwards ,and this usually doesn't give you the holeshot once the race start tone sounds.

No comments:
Post a Comment